Showing posts with label knitting. Show all posts

Monday, September 24, 2012

Spell My Name Swap goodies

I have taken a break from swaps for a while, but signed up for a few in the last month, trying to get my crafting fix in before the baby comes.  One of the swaps I did is one I have done before... the Spell My Name Swap, where you craft an item for each letter of your partner's name.  First, let me show you the amazing stuff that I received from my partner stacysews:  


She made all kinds of awesome Star Wars and owlie goodies for the coming wee one.  And an awesome Miss Piggie eye cold pack for my tired eyes and aching head and some handmade lip gloss in a totally sweet little case for my inevitably chapped lips during labor.  Amazing, no!?  

So, for Stacy, here is the package I made.  It turns out we have similar interests and styles, so I didn't have to do that much shopping.  I did buy the yarn for the "hat of frustration" but I literally had all the rest of the supplies in my stash.  


Hat of frustration (a.k.a. Letter S: Skully Skullcap):  

This hat is the third one I made from the initial pattern.  The first one came out baby sized with a weird flared brim.  The second one was slightly better, but was toddler sized.  I ended up changing the number of stitches I cast on, the length I made it, and even the intarsia pattern, which had weird deformed "X's" between each skull.  I had some separation anxiety when I mailed it off after spending so much time working on it.  

Letter T: Tattoo inspired brooch
This one is based on an awesome craft I did with my super crafty friends Abbey and Jenni two years ago for Valentine's Day.  I made one for myself at the time that says "Pookie" on it, and I wear it the entire month of February every year.  Since Stacy likes tattoo art, I thought it only appropriate that she have a crafty badge to show off her crafty and hardcore sides all in one!  It's felt, and I used blanket stitch for the edges, a simple whip stitch for the "banner" and back stitch for the lettering.

Letter A: Alice In Wonderland embroidered art
Stacy had Alice in Wonderland stuff all over her Wist and Pinterest, so I knew I had to include something "Alice Inspired."  I ended up creating this sort of cameo outline design based on the Disney Alice and I included an "eat me" mushroom for our little heroine.  It was basic back stitch, since the pattern was so detailed around Alice herself.  I was quite pleased with how it came out.  

Letter C is the Cameo Cup Candle you can see in the first picture.  I apparently forgot to take a close up.  It is done with soy wax and natural vanilla scent so that she can use the mug when the candle is gone.  I love making candles... so simple and so satisfying!  

Letter Y: Yummy Cupcake Bunting
I had trouble with the letter Y.  I was thinking Yeti at first, but couldn't figure out anything yeti to craft. Then I saw the awesome cupcake bunting on Stacy's Pinterest, and KNEW I had to make it for her.  Since I already had my letter C, I thought, what are cupcakes if not yummy?  Bingo... letter Y.  This is a very satisfying pattern and project.  Super fast and really great looking when complete.  

I love the Spell My Name Swap.  It requires a bit of creative thinking, but for the most part, you can really craft things that your partner will love, and that fits their likes and personality.


Monday, July 9, 2012

Baby Extravaganza!

I've gone a little crazy with the baby items.  My nesting is definitely manifesting in the urge to make tiny cute things for the parasite.  I make things for myself here and there, but mostly I'm crafting tiny, and I'm rocking cute.  Here are the items I've finished yesterday and today:  


Cute and tiny, right?  

I've attempted to make a couple of hats already.  I say attempted not because they didn't turn out well... they did... but one was way too big and fit on my giant noggin, and the other one was too big (like more for a 3-6 month old) and way too light weight.  Guess I have a spring hat and the other hat will be donated to a not-so-needy, but cute and deserving toddler.  This time around, however, I chose proper yarn (bought at a garage sale in Eugene, OR for fifty cents!), made it the right size, and even managed to work in some fashionable cables!  


The yarn is super soft and the variegation makes it interesting, but the colors are still neutral and not too babyish.  I loathe pastels.  The pattern itself was extremely simple and still yielded excellent results.  I somehow screwed up my decreases, but I just made it work at the top.  There's a cute little nubbin made from knotting an i-cord.  Cute, whimsical, and not as weird-looking as a pom pom.

I needed a model, so my garden buddha stood in for the parasite.  Cute, yes?  


The other item that I finished today was this cute stuffed ball.  I have a ton of flannel scraps left over from making bassinet sheets, so I used some of them to make this ball.  I used an excellent tutorial from the Purl Bee.


I'm pretty pleased with how it turned out.  I had some problems at the ends with the flannel fraying, but because it was at the ends of the machine sewn panels, I was able to hide it with the tops.  I am wishing I had done a panel with the turquoise polka-dot and done the circles on top with the plain green, but I'll keep that in mind for the smaller sized ones.  The large took up over half a bag of fiber-fill, so I'll have to do the smaller ones if I do some more!  

Thursday, June 21, 2012

Fancy Pants

I am the first one to admit that I am a "fair weather" knitter.  I like quick projects.  Not necessarily "easy" projects, but quick.  I like to start and finish them in 3 days at the most.  I hate weaving in ends, I don't like color changes, and I want things to be mostly useful.  That being said.  I have completed one afghan for myself (it was crochet, and technically the first thing I ever made... hey, go big or go home) have done a few baby blankets which have taken longer than a few days, and have started (and failed to finish) three sweaters and two other afghans.  Yep.  I stick to hats, mittens, scarves, bags, and doo dads.

But, I bought this really beautiful cotton yarn and knew I wanted to make something really special with it.  It was so soft, and the colors were so rich and pretty.  I bought 2 skeins on sale, about 360 yards all together, so that meant my project had to fit those yardage guidelines.  I went on Ravelry (my obsession) and entered my criteria (I love an easily searchable pattern site!) and came up with a few options.  But, seeing as how everything I'm wanting to craft right now is for Baby Boo, I decided on the cutest pair of knitted bell bottom baby pants.  I went with the newborn size, hoping that these will be the perfect size for bringing the little one home from the hospital.  They turned out way better than I could imagine, even with all the seaming I had to do on the waistband and around the inseam.  Here they are, in all their adorable glory:

Seriously, are they not the cutest!?  I wish I had a baby to model them in, but you'll have to wait 5 more months for that.  They're the perfect colors for a fall/winter babe, and because they're done on smaller needles than recommended for the yarn, they're a tight weave and should be really warm and soft.  I need to do a round of onesie dying so that I can get a little brown top to go with them.  I'm so excited with how they turned out.  No pastels for this baby!  Added bonus... they only took me 4 days to complete!  Apparently I'm not inept at making articles of clothing, just large articles of clothing.

Tuesday, June 12, 2012

Give a Hoot Mug Cozy

After doing the Hootie Booties a while ago, I've eased my fears about an owl cable.  It's pretty much the easiest cable there is, and looks adorable.  So, I found a rad pattern for a mug cozy... I'm totally obsessed with making and using them, though I'm not sure anyone else shares my weird obsession.  Anyway, I grabbed a spare half-skein that I've used for two other cozies (told you I had an obsession), and knit it up in an evening.  I'm pretty pleased with how it turned out, too, though next time, I'll be going down a needle size, and also doing 2 fewer ribbing rows at the bottom, so it's not so tall.  

And here's a close up of the owl cable.  I don't really have any buttons that fit for the eyes, and I haven't yet raided the bead stash, but I sort of like it without the creepy eyes added.


Monday, March 5, 2012

Eco Craft Swap

Here is the latest swag I made for a craft swap. The theme was Eco/Hippie, and my partner was really into trees, so I tried to go with as many tree-ish things as I could. I also made some cat toys for her kitteh and some fun gift tags made out of recycled security envelopes, done with some paper cut-out stamps I had of a butterfly and a dragonfly. I may do that craft again for myself for gift tags at birthdays and holidays!

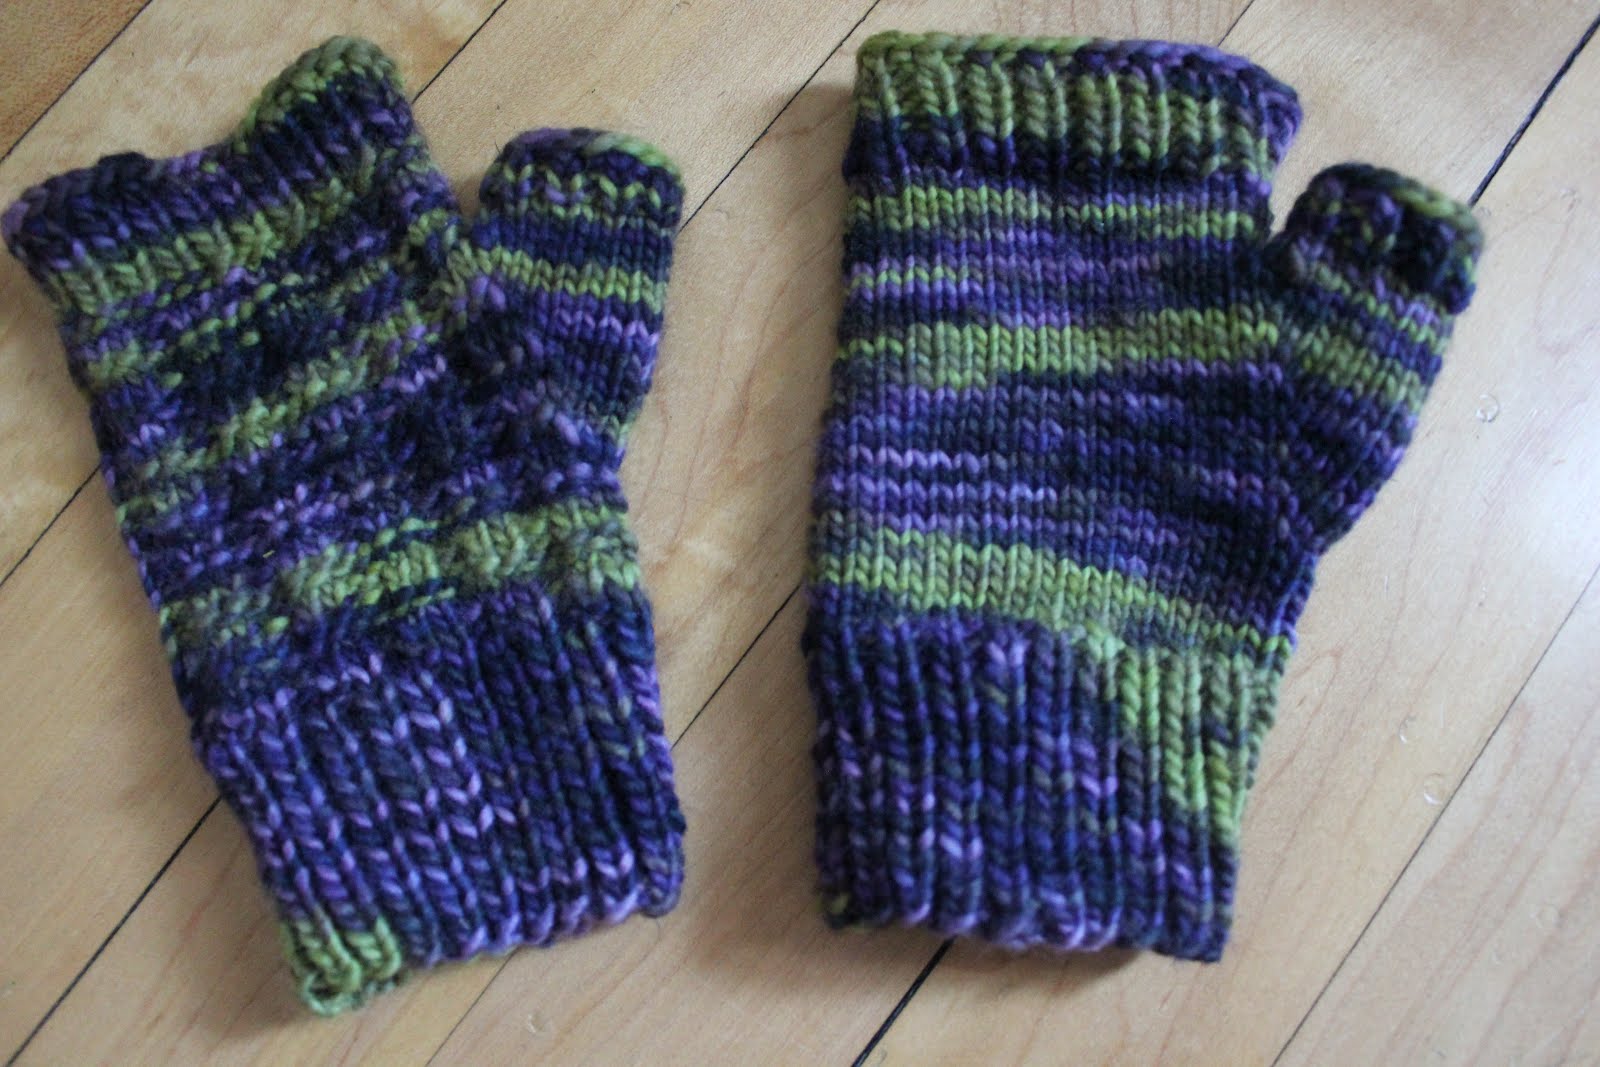
The one thing that my partner really wanted was a pair of fingerless gloves. I found some really luscious malabrigo worsted alpaca yarn in a colorway called dragonfly. pretty. And the gloves have a mild waffle-weave on the top of the hand.

Then I tried something a little different. I made these fun pins with three different buttons glued together and some fabric leaves made with scraps. They turned out pretty awesome, I think.

My partner had these fun tree appliques listed on her Pinterest board, but there was not a pattern for them. I ended up writing up a pattern and made them for her, and also sent her the pattern, as she is a crocheter, so she can make some more for herself if she wants.

Finally, my favorite thing that I made for this swap. I do not consider myself an embroiderer, but I saw a really neat faux bois piece on her Pinterest, and decided to try it out. I put her and her boyfriend's initials in the middle of the heart that is "carved" into the wood. I'm totally psyched with how it turned out, and hope to make some more. Wedding presents, anyone?


Wednesday, January 25, 2012

Rainbow Brite!

When I was little, I LOVED Rainbow Brite. I had the doll and her horse, Starlite, and always wanted one of the Sprites. Anyway, I recently participated in an 80's Cartoon swap, and was hoping hoping hoping that my partner liked Rainbow Brite because I wanted, originally, to make legwarmers that looked like her awesome puffy boots! Well, My partner did like Rainbow Brite, but when I was trying to work out a pattern for legwarmers, they looked terrible, so I ended up scrapping that and did a quick search for some fingerless gloves. Lo and behold, others out there love the RB as much as I do, and I found this pattern. So, I spent probably close to an hour finding the right colors that went together, but which didn't look too "primary" or childish, and then set to work on them during my vacation in Oregon.
I was slightly confused at first, because these mitts are knit inside out for the wrist section, thus leading them to look like this as I was going along:

I had some serious doubts. I also wasn't paying attention to the pattern as much as I should and missed that I was to be decreasing every new section, so had to frog the entire cuff of my first one down to the green in order to fix that issue. Serves me right for not looking at the pattern. I also adjusted the pattern just a bit to increase the "bubble" effect on the wrist part, knitting for 8 rows and purling for 5 instead of 7 and 7.

Anyway, when it came time to turn the glove "right" side out, I was relieved to find that they looked exactly as I had wanted them to look!


Ignore the fact that you can see serious seams where I changed needles. That is a personal knitting problem that I have yet to fix, but which I have learned to remedy when sewing in ends and making final adjustments. :)

The pattern called for some color work in the hand to knit in a yellow star. I suck at color work. I hate color work. I decided not to do the darn yellow color work star on the blue background and told myself I'd figure it out later. So, here is the final product-- sans star.

But, somehow, it just wasn't right without the little star on the hand, so I decided to cut a star out of felt and sew it on with blanket stitch. I found a halloween cookie cutter in the shape of a star which was exactly the right size, so didn't have to struggle with my terrible star drawing skills! Here they are with the stars:


So cute, right!? I was sort of sad to part with them, but since my swap partner had told me she has had past bad swapping experiences, I felt like maybe these and the other awesome stuff I sent her would help to make up for the crappy times in the past. Once she receives the package, I'll post another blog with all the awesome 80's items in it. :)

Tuesday, December 20, 2011

The Big Bang and a Blueberry

Apparently all I really needed to do to amp up my productivity and creativity was to quit working and get obsessed with craft swaps! :) Okay, maybe it's the time of year, or the fact that I'm not stressed out and exhausted all the time, or maybe I'm just enjoying it more, I don't know, but I've been doing a lot of knit and crochet projects lately. Not least of which is the awesome Big Bang Theory crocheted dolls for the awesome rubylynns, who you may remember I did a craft swap with earlier this year.

She found this awesome pattern for making all the characters of the show out of crochet (Amigurimi for those of you up with the lingo!) but she is not yet a crocheter, and yes, the patterns were a little bit complicated with the color changes and crocheting in the round, etc. So she asked if I could make them for a friend of hers who loves the show. Enter some experimenting and a lot of scrap cotton yarn, and you have.....


... totally awesome crocheted dolls of Leonard and Sheldon. I'm really pleased with how they turned out, especially considering that this was my first "real" Amigurimi project (I had made the bats for my halloween craft swap, but that was basically just a stuffed ball with stuff sewn on it.) I also had do do some adjustments to the pattern... I'm not sure what was up, but the pattern for Leonard's torso was totally weird, so that it looked like his body was twisted. Weird.

On to the Blueberry part of this post.

I found this GORGEOUS blue chunky yarn when I was in Sioux Falls, SD over Thanksgiving:

I've used the Wool-Ease Thick and Quick before, but I have NEVER seen this beautiful blue before, so I snatched up 3 skeins. It was a little bit expensive, but totally worth it for the results of the project I made with it.

I envisioned a gorgeous chunky mesh scarf kind of like the Vesta scarf from Paula Purls. I started with her pattern, but quickly diverted and changed the whole thing. Oh well, I feel like patterns are there to inspire more than to be followed, anyway! :)

Here is the scarf in progress. Aren't my knitting needles gorgeous. I found them on sale for $3 marked down from $20. Love the Rosewood!

Because the yarn is so bulky and the pattern so simple to repeat, this scarf knitted up really quickly. And because it only took 2 skeins for the scarf, I used the third skein to make a matching hat.

And here they are on:

I really need some models who are not ME. I hate trying to take good pictures of myself wearing my stuff. Meh.

If you like this hat and scarf set, check out my etsy site for this and many other lovely knitted concoctions! :) Nothing beats shameless self promotion!

Friday, November 11, 2011

Iris Mittens-- Christmas sneak peek

So, for Christmas this year, I'm attempting to make as many gifts as I can. I've got 4 done and 3 mostly done. Woo hoo! I'm giving a sneak peek at one, hoping that the recipient doesn't read this or guess that they are for her! This is the only one I have process pics for, so far. Maybe I'll remember to take photos of everything I made this year... maybe.

Anyway, one gift this year is this great pair of mittens:

Okay, so the photo is totally dorky, but you can actually see the mittens semi-okay in this one. I was having a battle with the light outside today. If I did regular flash, you couldn't see a thing. If I did night flash, everything was sort of washed out like this. Stupid crappy camera and no light box for photos (um... hint, hint... that's what I want for Christmas!)

So, here is the pattern I used (pulled up on my favorite knitting tool, my iPad... saves me so much paper) and the yarn. It's Berocco X-Press, which is sadly discontinued, but I got just enough for these mittens on sale at my LYS! The color way is "Purple to Green," Boring name, but, that's the name; I think it's the color of irises in spring, so I've called them Iris Mittens. The pattern is Shelburne from Knitty, Winter 2011, but I made some changes to the thumb, because it was too small, and I put a cable ridge on the side of mine that was not in the original pattern.
They knit up really quickly, due to the super chunky yarn. Here they are with the hand part finished, waiting for the fingers and thumb to be covered. They would be quite cute as fingerless, too, I think.

The completed fingers. I couldn't find my stitch holder, so I had to use some scrap yarn.
The finished mittens. They turned out so cute, and I LOVE the purple and green variegated color scheme of them.

It was cold out when I took this pic. And the stupid light problems continued, but they were totally warm and kept my fingers nice and toasty while I fought with the poor lighting in my back yard! Yay for completed Christmas gifts!

Hopefully I'll have some new blogs up soon which feature projects I'm doing for other people's Christmases. I have a pair of slippers on the sticks and will be trying my hand at some more complicated Amigurimi for my former swap partners!

Thursday, October 20, 2011

Craft Swap Goodies!

My awesome craft swap partner, Robin, has officially received her package of goodies from the Trick or Treat bag swap. That means I can post the crafty goodness on here! First off:

The most important part of the swap was to craft a really awesome bag. I happen to be well versed in the bag making, so that was pretty easy. I did have some major fabric-choosing anxiety, though, and walked around JoAnn Fabric with a completely different scheme that I didn't even like, before I went back for the plaid fabric and found the cute little vintage print hidden among the thanksgiving fabrics. This is the first time I've done a trim with a bag, and I think the little pom pom trim turned out really well. I also reinforced the handle with batting, which is my new favorite idea to keep the handle comfy and also to keep it from getting all scrunched up at the top.

Robin has two boys, Jakob and Bailey, so I couldn't leave them out of the craftiness! I made each of them a little bag with their name on it with the left over lining fabric. I free-handed their names with a bleach pen and added a little spookiness to each one.

The boys also got their own candy loot, which was a little more their speed. Skittles, Starburst, and Chocolate eyeballs. Awesome. I think much like a 7-year-old boy, so it was fun to do this for them. :)


Here is all the goodies that went inside Robin's bag all packaged up. I made four napkins out of the plaid linen fabric and used that to package everything. Below is the goodies (sans candy) all laid out:


I made that awesome potholder out of some sparkley cotton yarn I found at Hancock Fabric in Sioux Falls, SD. It was on super sale for 93 cents a skein! I had made it a while ago, not really knowing where it would end up, but it was the perfect addition to Robin's bag loot. Also, you can kind of see the rosette pin I made out of that same plaid fabric I'm obsessed with. I've tried to make rosettes out of fabric before, but haven't had much success. I threw out the rule book and tutorials I had found on-line and just made it the way I thought that it should be made, and it worked perfectly! I get a little obsessed with rules sometimes and forget the instinct part of crafting.

Finally, the piece-de-resistance was the crafted items for Robin and the boys. I purchased a candy-corn hat pattern, as she had listed one on her wist and I was dying to make one. It knit up really quickly, as it's a super thick yarn, and it's totally adorable with the little point on the head. She said she wore it out and got some great responses from people, so that's nice to hear. Also, I found a cute little batty pattern, which I love, and made one for each boy out of the remainder of the sparkley black cotton yarn from SD. I think they turned out great!


Friday, October 7, 2011

Give a Hoot.

So, at work about a week ago, I was working on one project or another, and one of my co-workers asked me if I have ever made an "animal head hat." While this seemed like a bit of a weird question, I assumed that she was getting at something, so I said that I hadn't but had seen plenty of patterns out there that I was looking to try out. One thing led to another, and she finally got to the point-- her two-year-old is going as an Owl for Halloween this year, and she was wondering if I could make him an owl head hat. She'd pay me. Well, I'll do just about anything for cash, so I hunted through patterns, piecing together what I liked from each of them and came up with this:


Turns out that Charlie is going to be a green and blue owl, so those were the colors I went with. Here is the process-- I made the chin strap and then cast on the rest of the hat in the round.

The main part of the hat was in two colors, one variegated blue and green and one light blue. Then I made a flap at the top in green and the variegated. I didn't want to finish it off in the round, because I needed some "ears" for the owl, so I left the top square and just sewed it together.


Then, after everything was sewed up, I made little tassels for the ends of the ears.


After the main part of the hat was constructed, I wove in the ends and attached a button. I found a little blue button that worked perfectly with the color of the hat.


Then I finished it off with the felt eyes and beak you saw above. It turned out so cute. I'm really happy with it, and I think little Charlie will look adorable in it. I'll see if I can get some pictures of the little guy wearing the hat to get the full affect.

Wednesday, October 14, 2009

Knitting Together

So much has happened over the last week... I'm at the point where I need to pick and choose, and ultimately, I choose crafts over food.  So, while the spinach, garlic and yellow cherry tomato pizza we made earlier this week was fantastic, what really feeds me lately are the needles and yarn that yield product in the end.  

I realized that I needed to make a list of who will be receiving what for the holiday season this year.  It's going to be an extremely low-key holiday for us, as I work directly before and after Christmas, so much of our gift giving will happen long-distance.  With that and the possibly self-flagellating decision to include the option of an "original knitted piece" by me as an award for our employees of the month at work, I have discovered possibly the most amazing knitting pattern ever.  And I feel some definite satisfaction in that I took a failed pattern, changed it, fixed it, altered it to meet my needs, and created what I think is hatly brilliance.  With that, I introduce "Violet."  (By the way, I really could use some new knitwear models... any volunteers?)

The official name of this lovely hat comes from the lovely Violet who was the first employee of the month for my department.  And the reasons I love it are:  chunky yarn, chunky needles, and cables.  It looks fancy, but isn't.  Amazing.  And, now, onto  my more heartwarming and exciting story. 

I have finished the zig-zag scarf!  And the completion of this most perfect scarf coincided with the most fantastic knitting meeting I've yet experienced.  I met her on the train.  She was maybe 75 or 80, Swiss, lovely.  She was watching me knit and when I noticed, she shared that she used to knit when she was younger.  We struck up a wonderful conversation and chatted the whole ride home... I almost missed my stop, actually.  And in the end, she asked if she could give me some mohair she's had for years, as she can no longer knit, and she wanted me to have it.  I'm hoping for a call, as I quickly ripped out a page of my notebook and scribbled my number on it. 

And now, the scarf I was completing as we shared this moment of knitterly communion:  


Again, I request some new models... it's slightly embarrassing to continue taking pictures of myself... 

And a close-up:


More to come on the intended Asian vegetable soup and mustard greens with cornbread that are planned for the menu this week.