Thursday, July 26, 2012

Stig's Flannel Pants

 So, I've seen tons of tutorials on making baby pants.  Turns out, since I've made several pairs of pants and understand the basic construction, it's super easy and I don't really need a tutorial!  So, I made some pants for Stiggy today out of an old flannel shirt of my grandma's.  I'm trying to amass flannel shirts to make a baby blanket, but the color on this one didn't really mesh with the other ones I have, thus, pants.  Here is a close up of the flannel pattern.


It's difficult to match that turquoise with other flannels and not have it look totally psychotic.  But it looks super cute at tiny pants!  


I'd like to point out that I almost matched up the lines of flannel perfectly without even trying to do so.  You know that if I had tried, it never would have worked.  Happy accidents lead to adorable pants.  

I was able to whip these out in about 10 minutes.  Because I used an old shirt, I just cut them out on the bottom hem of the shirt, so that I didn't have to hem them myself.  This also meant that I could have a side seam and still only use two pieces of cut fabric. I used a pair of baby pants I had bought on super sale for a quarter at Target as the pattern, so you can pretty much use any pair of pants that fit well to make your pattern.  Just fold in half, place on a fold, trace around leaving about 1/4 inch for the seam allowance and about an inch (or more if you're a messy cutter and ironer like me) for hem allowance at the top. 

Then, basically, place right sides together, sew the crotch pieces together and then sew around the legs.  Iron a top hem, sew it, leaving an opening, and insert elastic (which I happen to have just laying around, because I have problems.).  Sew up the elastic to the appropriate waist length so that it stretches to fit, but won't cut off circulation, and sew the hole closed.  

Easy Peasy, Lemon Squeezy!

Friday, July 13, 2012

Tom Waits for No Baby

I've been slowly... oh, so slowly... trying to clean out our office/craft room to make room for The Stig's new nursery.  So, today I tackled a pile of fabric in a basket that I probably haven't gotten to the bottom of in 2 years, and had no idea what was in it.  Well, apparently at some time, I hid a couple of Paul's grosser t-shirts from him so that they would exit his "wearable" rotation.  One of them, I had originally planned on stretching on canvas stretchers to make into an art piece.  It was an awesome Tom Waits shirt that he was really attached to.  But, I thought, with the babe on the way, maybe I could make it still wearable, just not so much for Paul anymore.  There was a tutorial on This Mama Makes Stuff (I'm obsessed with her blog... it's amazing) for making a baby gown out of an old t-shirt, so I pulled up the tutorial, printed out the pattern, and set to cutting, hemming, and sewing.  The finished result is AWESOME!  


Just so you can see that the image on the shirt was really that cool and totally worth saving:  


Don't get me wrong... I didn't just whip it out without any issues.  I had a mis-sewn piece that led to torn-beyond-use fabric and to cut new sleeves, so needed to find a different shirt to cut those from.  I ripped out and re-sewed multiple times.  My hems were terrible, so had to be fixed, but ultimately, it looks amazing and even has adorable little "pockets" for The Stig's little mitts to tuck away into.  


It's a great tutorial, and I'm extremely pleased with how my first jersey sewing project has turned out.  I have 4 more shirts waiting in the wings to become awesome new baby clothes.  I only regret that I didn't take a picture of the shirt's sorry state prior to hacking it to pieces so you can get a real sense of the amazing accomplishment this re-do was!  

Tuesday, July 10, 2012

Hydrate!

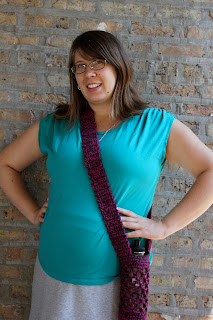
I finally got around to making something for myself yesterday!  I've been constantly thirsty with the crazy weather and the parasite both demanding all of my hydration.  So, I've been carrying my Klean Kanteen with me everywhere I go.  However, it leaks all over my purse, or it's hard to carry, and I have to put it down to do other things.  Annoying.  So, I made a little sling to carry it in!  Dorky, yes.  Do I care?  No.  


I loosely based the design off of a pattern I found on Ravelry, but I distorted it so much, I had to write down the pattern as I went in order to remember how I changed it.  I think I must have a very different water bottle... the initial one I made using the exact specs of the pattern was GIANT!

But, after some trial and error, I think it looks awesome, and it's super functional.  I used two strands held together of Lion Cotton yarn.  It used up almost all of the skeins.  The colors were Orchid and Espresso.  It also uses a size I crochet hook.  If the pattern is too big for your water bottle, as well, let me know, and I'm happy to type up my changes to the pattern.    


Bonus:  It doubles as a weapon in case of zombie attack!  That sucker is heavy and could definitely take off some zombie head if swung properly!

Monday, July 9, 2012

Baby Extravaganza!

I've gone a little crazy with the baby items.  My nesting is definitely manifesting in the urge to make tiny cute things for the parasite.  I make things for myself here and there, but mostly I'm crafting tiny, and I'm rocking cute.  Here are the items I've finished yesterday and today:  


Cute and tiny, right?  

I've attempted to make a couple of hats already.  I say attempted not because they didn't turn out well... they did... but one was way too big and fit on my giant noggin, and the other one was too big (like more for a 3-6 month old) and way too light weight.  Guess I have a spring hat and the other hat will be donated to a not-so-needy, but cute and deserving toddler.  This time around, however, I chose proper yarn (bought at a garage sale in Eugene, OR for fifty cents!), made it the right size, and even managed to work in some fashionable cables!  


The yarn is super soft and the variegation makes it interesting, but the colors are still neutral and not too babyish.  I loathe pastels.  The pattern itself was extremely simple and still yielded excellent results.  I somehow screwed up my decreases, but I just made it work at the top.  There's a cute little nubbin made from knotting an i-cord.  Cute, whimsical, and not as weird-looking as a pom pom.

I needed a model, so my garden buddha stood in for the parasite.  Cute, yes?  


The other item that I finished today was this cute stuffed ball.  I have a ton of flannel scraps left over from making bassinet sheets, so I used some of them to make this ball.  I used an excellent tutorial from the Purl Bee.


I'm pretty pleased with how it turned out.  I had some problems at the ends with the flannel fraying, but because it was at the ends of the machine sewn panels, I was able to hide it with the tops.  I am wishing I had done a panel with the turquoise polka-dot and done the circles on top with the plain green, but I'll keep that in mind for the smaller sized ones.  The large took up over half a bag of fiber-fill, so I'll have to do the smaller ones if I do some more!