Tuesday, October 23, 2012

End of the Swap Season

So, I had to get in a couple of swaps before baby came and I have to take a serious hiatus.  So, I did three in the last three months!  No big deal, right!?  Anyway, here are some of the goodies I made for the two swaps I haven't posted pics for yet:

The First Swap: End of Summer Random 

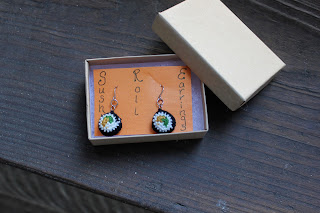
Crocheted Sushi Roll earrings!  I totally made the pattern up myself, and it's done with crochet thread and a teeny tiny hook.  I was quite pleased with myself!  


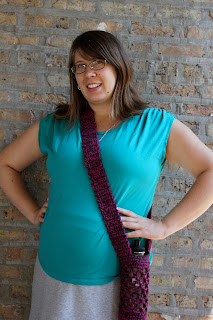
Awesome cape.  I've been wanting to make this for myself for a while, but decided to make it for someone else instead. (which is good, because it's technically too short for me, and I would have had to do math to figure out how long to make it.)  It has hand openings and a stiff collar.  I love the way it turned out!  


Stuffed key.  Haha!  My partner had a key collection, and I figured she didn't have one like this, yet!


These are knit and then machine felted coasters.  I've been really into felting, lately, and also have been trying desperately to use up as much yarn as I can before Stig gets here so there is less to store.  Two birds!  


This is maybe my favorite thing I've made in a very long time.  It's a Dalek glove.  Seriously.  A Dalek glove.  A pair for myself is definitely in order (along with the Dalek hat I found!)


This is a pattern I created myself.  It's a paintbrush roll.  there are individual slots for brushes, and the top folds down to keep ends from poking out.  Then you roll it up, and the end with a flap has a tie on it, so you just tie it closed!  I was quite pleased with myself, once again.  


The Second Swap: Falling into Autumn


Felted sweater goodies.  I made rice bag handwarmers.  I love handwarmers for winter.  Heat em up for a couple of minutes and pop them in your pockets on the way out the door.  Perfect for warming up fingers after scraping your car windows.  And, they're recycled. 


These are pretty lacework fingerless gloves.  My partner wanted some, so I figured I'd comply, since they're my speciality.  Once I wrestled with the pattern to figure out what the heck was wrong with it, they are really quick and easy.  I will not route you to the pattern, because it's terrible and I had to re-write it.  


My favorite thing I made (and my partner's favorite thing she received!) was this set of acorn potholders.  She said she had a thing for acorns, and I thought about doing "porcelain" ornaments, but then I got obsessed with felting, so did these instead.  I think they turned out fab, and I was super stoked about how the applique came out on them.  And, again, recycled!  


I've had this mug sitting in my stash for a long time because I was somehow emotionally attached to a mug I got at the thrift store.  It's a problem.  Anyway, in my nesting desire to clean out every nook and cranny of my life, I decided it was time.  Plus, it was fall colored, and Autumn was the theme of the swap.  So I poured a vanilla soy candle into it, and sent it on it's way to a new home in Iowa.  


And, though you may not be able to tell by this picture, this is a pillow cover.  Again, a felted sweater.  It was a cardigan, and I liked how the buttons looked, so I salvaged the entire body of the sweater for this one.  I didn't get the pillow filling made in time, but it fits a standard pillow, so I will make the filler and send it later.  
Thursday, October 18, 2012

I Love a Commission!

So, recently I got an Etsy order for a commissioned pair of leg warmers like the green cabled ones I posted a pattern for.  She just wanted them in white.  My first round of making them was a slight disaster.  I tried using a cheaper yarn alternative that was a true "white" and they turned out terribly.  No stretch, way too long, totally ridiculous.  So, I went and got new yarn today and whipped up the first one in the proper yarn, even though it's a little "cream" colored.  I'm slightly jealous of them and may want to make myself a pair, too.  They look fantastic in white!

(Yes, my thighs look giant... it was taken at an angle and I'm pregnant.  I'm over it.)


I also had a friend ask if I could make a specific fingerless glove pattern for her to use for her Halloween costume as a cat.  She sent me this pattern from Lion Brand that I had seen and wanted to make for another friend at one point (like 3 years ago), but then lost interest.  Anyway, interest piqued, especially since she is paying AND she gave me a deadline.  I work much better with a deadline imposed by someone else.  Here's how they turned out:


Not the most beautiful picture I've ever taken since it was with my phone, but the gloves themselves turned out amazingly well.  Especially since I didn't have to buy any new yarn for them.  It was all stuff from my stash.  And though you can't really tell in the picture, the black has some pretty sparkle to it, and since she's slightly obsessed with sparkle, they're even more fabulous!  Yay for kitties!  

Monday, October 1, 2012

Baby Cuteness

My dear friend Karen is expecting a little boy about a month before I am.  Therefore, I felt the need to make cute little crocheted things for said baby.  I settled on a couple of ridiculously easy and cute hats made from some chunky yarn I had laying around.  The first one is white with a lime green border:  


And my trusty model wearing the cute little chunky hat:  


The second one is this great blueberry color, that I chose because they are decorating the baby's nursery in L.A. Dodgers colors.  I thought this was a pretty close color to Dodger blue.  And I thought it was too plain as it was, so I added a pom pom... love a pom pom!  


And the model:  


These are seriously the easiest hats to make.  And the pattern is very good.  I made both hats in about 20 minutes.  It's a great stash buster if you have some chunky yarn laying around.  The pattern is from Oodles4Noodles and is really fantastic.  Great pattern for a new crocheter, as well!  

Monday, September 24, 2012

Spell My Name Swap goodies

I have taken a break from swaps for a while, but signed up for a few in the last month, trying to get my crafting fix in before the baby comes.  One of the swaps I did is one I have done before... the Spell My Name Swap, where you craft an item for each letter of your partner's name.  First, let me show you the amazing stuff that I received from my partner stacysews:  


She made all kinds of awesome Star Wars and owlie goodies for the coming wee one.  And an awesome Miss Piggie eye cold pack for my tired eyes and aching head and some handmade lip gloss in a totally sweet little case for my inevitably chapped lips during labor.  Amazing, no!?  

So, for Stacy, here is the package I made.  It turns out we have similar interests and styles, so I didn't have to do that much shopping.  I did buy the yarn for the "hat of frustration" but I literally had all the rest of the supplies in my stash.  


Hat of frustration (a.k.a. Letter S: Skully Skullcap):  

This hat is the third one I made from the initial pattern.  The first one came out baby sized with a weird flared brim.  The second one was slightly better, but was toddler sized.  I ended up changing the number of stitches I cast on, the length I made it, and even the intarsia pattern, which had weird deformed "X's" between each skull.  I had some separation anxiety when I mailed it off after spending so much time working on it.  

Letter T: Tattoo inspired brooch
This one is based on an awesome craft I did with my super crafty friends Abbey and Jenni two years ago for Valentine's Day.  I made one for myself at the time that says "Pookie" on it, and I wear it the entire month of February every year.  Since Stacy likes tattoo art, I thought it only appropriate that she have a crafty badge to show off her crafty and hardcore sides all in one!  It's felt, and I used blanket stitch for the edges, a simple whip stitch for the "banner" and back stitch for the lettering.

Letter A: Alice In Wonderland embroidered art
Stacy had Alice in Wonderland stuff all over her Wist and Pinterest, so I knew I had to include something "Alice Inspired."  I ended up creating this sort of cameo outline design based on the Disney Alice and I included an "eat me" mushroom for our little heroine.  It was basic back stitch, since the pattern was so detailed around Alice herself.  I was quite pleased with how it came out.  

Letter C is the Cameo Cup Candle you can see in the first picture.  I apparently forgot to take a close up.  It is done with soy wax and natural vanilla scent so that she can use the mug when the candle is gone.  I love making candles... so simple and so satisfying!  

Letter Y: Yummy Cupcake Bunting
I had trouble with the letter Y.  I was thinking Yeti at first, but couldn't figure out anything yeti to craft. Then I saw the awesome cupcake bunting on Stacy's Pinterest, and KNEW I had to make it for her.  Since I already had my letter C, I thought, what are cupcakes if not yummy?  Bingo... letter Y.  This is a very satisfying pattern and project.  Super fast and really great looking when complete.  

I love the Spell My Name Swap.  It requires a bit of creative thinking, but for the most part, you can really craft things that your partner will love, and that fits their likes and personality.


Thursday, August 16, 2012

Mama's Flannel Pants

So, enough of making cute things for this tiny being who does not yet have a body to himself!  I made some pants for me, this time!

Don't judge... I haven't taken a shower or finished my first cup of coffee yet today.  

I used the same idea as for Stig's pants, and super-sized it.  My mom had sent me a pair of flannel pajama pants she found at a thrift store (I'm pretty sure they've never been worn, even!  Good find, mom!) that will hopefully keep fitting me as I get bigger this fall.  They are green with pictures of Eeyore all over them.  Not exactly a fashion statement, but they are pajamas, after all, so who really cares.  The only things I wasn't completely thrilled with were the drawstring waist and the fact that they tapered at the ankle (and will probably shrink a bit and be too short for my gargantuanly long legs.

It also so happened that I had about 3 yards of flannel fabric that I've been meaning to make some pajama pants out of, so I decided no time like the present and pulled out the fabric yesterday.  I used the Eeyore pants as a general template, making the legs much wider at the bottom, just eyeballing it.  I really hate to measure, which probably negatively affects my sewing, but I don't really care.  A few LLLLOOOONNNGGG seams, some hems, and some elastic in the waist (yes, I have reams of elastic just laying around my house as well) and we're done!   

And for proof that I really am pregnant, and not just making up this tiny being that has taken over my body and life, a preggo picture:  


Thursday, July 26, 2012

Stig's Flannel Pants

 So, I've seen tons of tutorials on making baby pants.  Turns out, since I've made several pairs of pants and understand the basic construction, it's super easy and I don't really need a tutorial!  So, I made some pants for Stiggy today out of an old flannel shirt of my grandma's.  I'm trying to amass flannel shirts to make a baby blanket, but the color on this one didn't really mesh with the other ones I have, thus, pants.  Here is a close up of the flannel pattern.


It's difficult to match that turquoise with other flannels and not have it look totally psychotic.  But it looks super cute at tiny pants!  


I'd like to point out that I almost matched up the lines of flannel perfectly without even trying to do so.  You know that if I had tried, it never would have worked.  Happy accidents lead to adorable pants.  

I was able to whip these out in about 10 minutes.  Because I used an old shirt, I just cut them out on the bottom hem of the shirt, so that I didn't have to hem them myself.  This also meant that I could have a side seam and still only use two pieces of cut fabric. I used a pair of baby pants I had bought on super sale for a quarter at Target as the pattern, so you can pretty much use any pair of pants that fit well to make your pattern.  Just fold in half, place on a fold, trace around leaving about 1/4 inch for the seam allowance and about an inch (or more if you're a messy cutter and ironer like me) for hem allowance at the top. 

Then, basically, place right sides together, sew the crotch pieces together and then sew around the legs.  Iron a top hem, sew it, leaving an opening, and insert elastic (which I happen to have just laying around, because I have problems.).  Sew up the elastic to the appropriate waist length so that it stretches to fit, but won't cut off circulation, and sew the hole closed.  

Easy Peasy, Lemon Squeezy!

Friday, July 13, 2012

Tom Waits for No Baby

I've been slowly... oh, so slowly... trying to clean out our office/craft room to make room for The Stig's new nursery.  So, today I tackled a pile of fabric in a basket that I probably haven't gotten to the bottom of in 2 years, and had no idea what was in it.  Well, apparently at some time, I hid a couple of Paul's grosser t-shirts from him so that they would exit his "wearable" rotation.  One of them, I had originally planned on stretching on canvas stretchers to make into an art piece.  It was an awesome Tom Waits shirt that he was really attached to.  But, I thought, with the babe on the way, maybe I could make it still wearable, just not so much for Paul anymore.  There was a tutorial on This Mama Makes Stuff (I'm obsessed with her blog... it's amazing) for making a baby gown out of an old t-shirt, so I pulled up the tutorial, printed out the pattern, and set to cutting, hemming, and sewing.  The finished result is AWESOME!  


Just so you can see that the image on the shirt was really that cool and totally worth saving:  


Don't get me wrong... I didn't just whip it out without any issues.  I had a mis-sewn piece that led to torn-beyond-use fabric and to cut new sleeves, so needed to find a different shirt to cut those from.  I ripped out and re-sewed multiple times.  My hems were terrible, so had to be fixed, but ultimately, it looks amazing and even has adorable little "pockets" for The Stig's little mitts to tuck away into.  


It's a great tutorial, and I'm extremely pleased with how my first jersey sewing project has turned out.  I have 4 more shirts waiting in the wings to become awesome new baby clothes.  I only regret that I didn't take a picture of the shirt's sorry state prior to hacking it to pieces so you can get a real sense of the amazing accomplishment this re-do was!  

Tuesday, July 10, 2012

Hydrate!

I finally got around to making something for myself yesterday!  I've been constantly thirsty with the crazy weather and the parasite both demanding all of my hydration.  So, I've been carrying my Klean Kanteen with me everywhere I go.  However, it leaks all over my purse, or it's hard to carry, and I have to put it down to do other things.  Annoying.  So, I made a little sling to carry it in!  Dorky, yes.  Do I care?  No.  


I loosely based the design off of a pattern I found on Ravelry, but I distorted it so much, I had to write down the pattern as I went in order to remember how I changed it.  I think I must have a very different water bottle... the initial one I made using the exact specs of the pattern was GIANT!

But, after some trial and error, I think it looks awesome, and it's super functional.  I used two strands held together of Lion Cotton yarn.  It used up almost all of the skeins.  The colors were Orchid and Espresso.  It also uses a size I crochet hook.  If the pattern is too big for your water bottle, as well, let me know, and I'm happy to type up my changes to the pattern.    


Bonus:  It doubles as a weapon in case of zombie attack!  That sucker is heavy and could definitely take off some zombie head if swung properly!

Monday, July 9, 2012

Baby Extravaganza!

I've gone a little crazy with the baby items.  My nesting is definitely manifesting in the urge to make tiny cute things for the parasite.  I make things for myself here and there, but mostly I'm crafting tiny, and I'm rocking cute.  Here are the items I've finished yesterday and today:  


Cute and tiny, right?  

I've attempted to make a couple of hats already.  I say attempted not because they didn't turn out well... they did... but one was way too big and fit on my giant noggin, and the other one was too big (like more for a 3-6 month old) and way too light weight.  Guess I have a spring hat and the other hat will be donated to a not-so-needy, but cute and deserving toddler.  This time around, however, I chose proper yarn (bought at a garage sale in Eugene, OR for fifty cents!), made it the right size, and even managed to work in some fashionable cables!  


The yarn is super soft and the variegation makes it interesting, but the colors are still neutral and not too babyish.  I loathe pastels.  The pattern itself was extremely simple and still yielded excellent results.  I somehow screwed up my decreases, but I just made it work at the top.  There's a cute little nubbin made from knotting an i-cord.  Cute, whimsical, and not as weird-looking as a pom pom.

I needed a model, so my garden buddha stood in for the parasite.  Cute, yes?  


The other item that I finished today was this cute stuffed ball.  I have a ton of flannel scraps left over from making bassinet sheets, so I used some of them to make this ball.  I used an excellent tutorial from the Purl Bee.


I'm pretty pleased with how it turned out.  I had some problems at the ends with the flannel fraying, but because it was at the ends of the machine sewn panels, I was able to hide it with the tops.  I am wishing I had done a panel with the turquoise polka-dot and done the circles on top with the plain green, but I'll keep that in mind for the smaller sized ones.  The large took up over half a bag of fiber-fill, so I'll have to do the smaller ones if I do some more!  

Thursday, June 21, 2012

Fancy Pants

I am the first one to admit that I am a "fair weather" knitter.  I like quick projects.  Not necessarily "easy" projects, but quick.  I like to start and finish them in 3 days at the most.  I hate weaving in ends, I don't like color changes, and I want things to be mostly useful.  That being said.  I have completed one afghan for myself (it was crochet, and technically the first thing I ever made... hey, go big or go home) have done a few baby blankets which have taken longer than a few days, and have started (and failed to finish) three sweaters and two other afghans.  Yep.  I stick to hats, mittens, scarves, bags, and doo dads.

But, I bought this really beautiful cotton yarn and knew I wanted to make something really special with it.  It was so soft, and the colors were so rich and pretty.  I bought 2 skeins on sale, about 360 yards all together, so that meant my project had to fit those yardage guidelines.  I went on Ravelry (my obsession) and entered my criteria (I love an easily searchable pattern site!) and came up with a few options.  But, seeing as how everything I'm wanting to craft right now is for Baby Boo, I decided on the cutest pair of knitted bell bottom baby pants.  I went with the newborn size, hoping that these will be the perfect size for bringing the little one home from the hospital.  They turned out way better than I could imagine, even with all the seaming I had to do on the waistband and around the inseam.  Here they are, in all their adorable glory:

Seriously, are they not the cutest!?  I wish I had a baby to model them in, but you'll have to wait 5 more months for that.  They're the perfect colors for a fall/winter babe, and because they're done on smaller needles than recommended for the yarn, they're a tight weave and should be really warm and soft.  I need to do a round of onesie dying so that I can get a little brown top to go with them.  I'm so excited with how they turned out.  No pastels for this baby!  Added bonus... they only took me 4 days to complete!  Apparently I'm not inept at making articles of clothing, just large articles of clothing.

Tuesday, June 12, 2012

Give a Hoot Mug Cozy

After doing the Hootie Booties a while ago, I've eased my fears about an owl cable.  It's pretty much the easiest cable there is, and looks adorable.  So, I found a rad pattern for a mug cozy... I'm totally obsessed with making and using them, though I'm not sure anyone else shares my weird obsession.  Anyway, I grabbed a spare half-skein that I've used for two other cozies (told you I had an obsession), and knit it up in an evening.  I'm pretty pleased with how it turned out, too, though next time, I'll be going down a needle size, and also doing 2 fewer ribbing rows at the bottom, so it's not so tall.  

And here's a close up of the owl cable.  I don't really have any buttons that fit for the eyes, and I haven't yet raided the bead stash, but I sort of like it without the creepy eyes added.


Monday, June 4, 2012

Laying up the Layette

So, as I mentioned in the earlier Bassinet post, I'm making all the sheets for said awesome vintage bassinet.  I lucked out today and found some really adorable flannel fabrics at the fabric store.  So, I set to work and cut out all the sheet templates, and sewed one up.  Here's the result:

I really like this pretty lime green fabric with the white ferns.  It's cute enough to be for baby, but not so "cutesy" as a lot of the infant fabrics, and avoids the horrid pastels that I hate so much. I love how it looks with the white wicker, too.

Friday, June 1, 2012

Knitting to Amuse the Masses

I had some left over soft cotton yarn from a failed project.  Let's just say the newborn size hat fit my big ol' head.  So, I decided I'd use it up and make a washcloth, since I wasn't sure how much yarn was left in the skein.  So, after some extensive (by that I mean about 2 minutes worth) research, I found THE pattern.


Come on, it has a goat on it!  

It's done in Cottontots yarn and is super soft.  I pretty much love it.  And it only took me about 2 hours to complete.  Yay!  

Wednesday, May 23, 2012

Hootie Booties!

Being a knitter, I, of course, am obsessing about what I will knit for the babe.  I figured I'd start with something small, something easy.  Booties.  No problem, right?  Well, it turns out I'm really picky about booties, apparently, and it took me 2 months just to find a couple of patterns that I liked, not to mention to try them out.  After three failed attempts... one had an illegible pattern that I just couldn't figure out, one pair were GIANT when they finished, and one pair ended up all twisty and weird... I finally settled on the cutest pattern from Ravelry called "Hooties."  My first attempt needed to be tossed out, because one of the steps was not quite sussed out, but once I figured out what the pattern was asking, they turned out really well.  View the yarn porn:


Can you see the owlies?  I had a bit of a hard time getting a good picture of the cabling where you could really tell they were an owl motif, but here's one where you can see the sides, as well.  I used some really pretty purple beads I found in my bead stash, and the yarn was a ball that came in a bag of yarn my mom found at a garage sale.  Yay for materials on hand!  


I think you can see the owls better in this picture.  I'm really happy with how they came out.  And I still have a ton of the pretty tan yarn left, so if I find another bootie pattern in another 3 months, I can make another pair!  

Monday, May 21, 2012

And Now Announcing...

As I mentioned in the last blog, I have a big announcement to make.  In true Sarah-Style, I decided to craft my way to the big announcement:  

 Yep, I'm gonna be a crafty mama in November!  I found a cheap-o t-shirt at the thrift store (of course) and did a freezer-paper stencil of the words on it.  Considering I hadn't done a freezer-paper stencil in something like a year, I think it turned out really well!  Yay for crafts, yay for babies, yay for crafting babies and baby related items!  


With that thought, we are now in the process of trying to figure out our lives, trying to decide what this all means, and getting ready for a little one to join us on this journey.  So, what does a baby need (besides awesome parents, love, food, and clean diapers, of course)?  


A really awesome bed.  


There are few beds that are more awesome than this one!  And, it was a total steal!  I found it at a garage sale for $10.  I couldn't whip out my cash fast enough when they told me how much they were asking.  I thought I had mis-heard the first time, cause I was ready to shell out $50 at least!  

It was pretty dusty and will need a new coat of paint (non-toxic, of course, to make sure no old flakey paint ends up in baby's sleeping little face), but it's freaking amazing.  


It even came with a mattress that was in perfect condition!  It's a totally wacky size, though, so I'm going to have to flex my sewing muscles and make all the sheets for it.  I raided the stash today to make a sample one.  I figured I'd better figure out how hard it was going to be, so I knew how much time I was going to commit!  

It turned out quite well, actually:  


What, doesn't everyone have random pieces of the world's softest Yellow minky fabric in the exact perfect size just laying around their house?  Not to mention two different sizes of elastic, and snap grommets?  Well, that's what happens when you have a problem with craft supplies. 


Because the mattress is so long and also pretty thick, I was struggling with getting it to fit well around the main body of the mattress.  The solution came in the form of the wider elastic and the snap closure:  


Problem solved, adorable, cozy bedding prepared for baby-boo.  Winner.   

Friday, May 4, 2012

80's flashback

It's been a while since I posted anything, so figure I better play catch-up.  I've done some awesome swap projects lately, which means I've gotten to make awesome things, and haven't had to keep them in my house!  Yay!  So, we'll start with the piece-de-resistance... the Jedi Robe:  

I felt like the world's biggest dork posing as a Jedi, but the robe itself is awesome.  I made it for Rob in Canada for an 80's movie swap... more on the 80's movie (sci-fi nerdiness) later.  

Next though, is my favorite thing I've made in a long time.  I did an Angel package for Liz of 80's cartoon stuff.  I still had lots of supplies left over from making Dani's package, and, frankly, I love 80's cartoons.  So, the best thing in the world today is....

It's a Jem headband!  I did the Jem lettering in shrinky-dink!  It turned out amazingly well.  I then did 2 clear coats of nail polish over the top.  In the future, it would be better to use spray sealant, but I didn't have any, so I was just very careful to try and avoid the sharpie-bleed effect.  I love it and was a little sad to see it go, but I know Liz is going to love it as she had all kinds of fascinator headbands on her Pinterest.  

Next, again, a bit out of my usual comfort zone, was an ice cream cozy.  Liz had mentioned that she wanted one, so I whipped up a quick one using some random orange and black scrap yarn that I had laying around.  I used orange and black because she has a Garfield collection, and I had decided to do a Garfield applique on the front:  

I was totally psyched with how awesome this came out!  

Now, back to the 80's movies.  I did two other things for Rob, besides the awesome Jedi robe.  First, was the silliest crocheted item I've ever made... 

If you've never seen Aliens (as I hadn't, so I needed to do some research), this is a Facehugger.  I put wires in it's legs and tail so that it will cling to things.  Great party trick!  

Finally, probably my favorite thing I made for this swap were the Star Trek magnets:

They are cross-stitched on heavy plastic to give them stability.  I did a ton of research and sketching to get the insignia's correct for The Original Series and I used metallic thread... never again will I use metallic thread.  It's the worst thing in the world.  But, the magnets turned out amazingly well.

Anyway, that's the craftiness I've been up to lately.  I'll be having a big announcement coming and the tone of my posts will likely be taking a turn for the very different, but you'll have to wait another month or so for that!  :)